
Today we’re talking about control. About those tasty skills that take the blessed c-word from your opponent and snatch it for yourself. Those skills that let you foil his plans, throw spanners in the cogs.
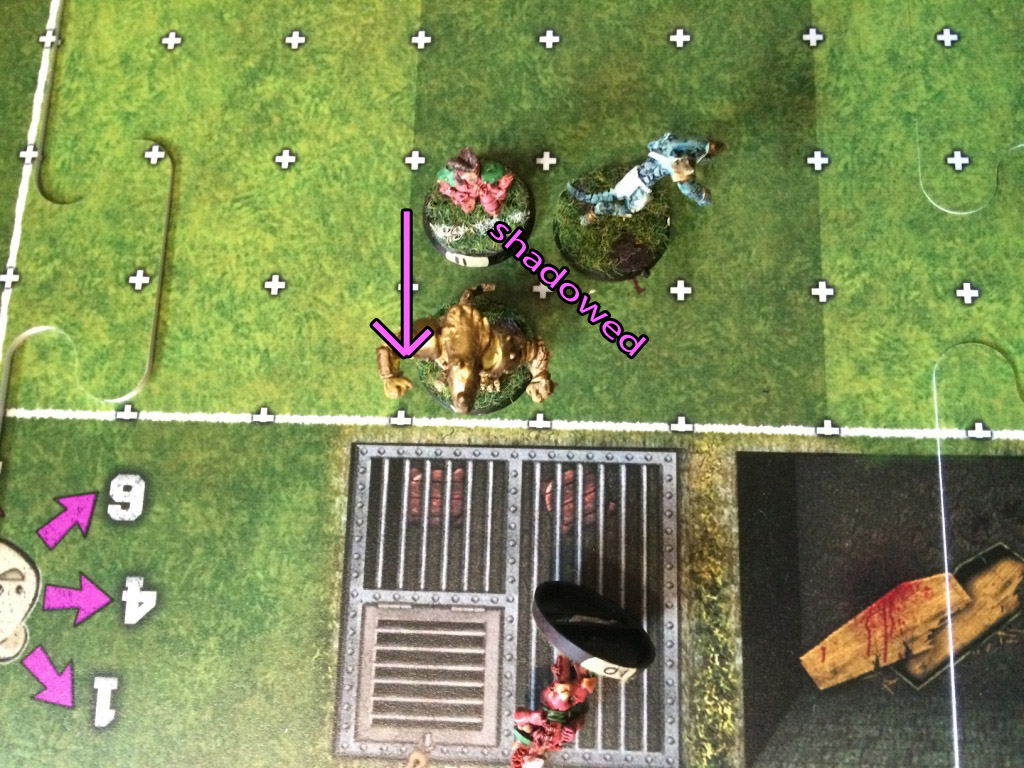
Shadowing
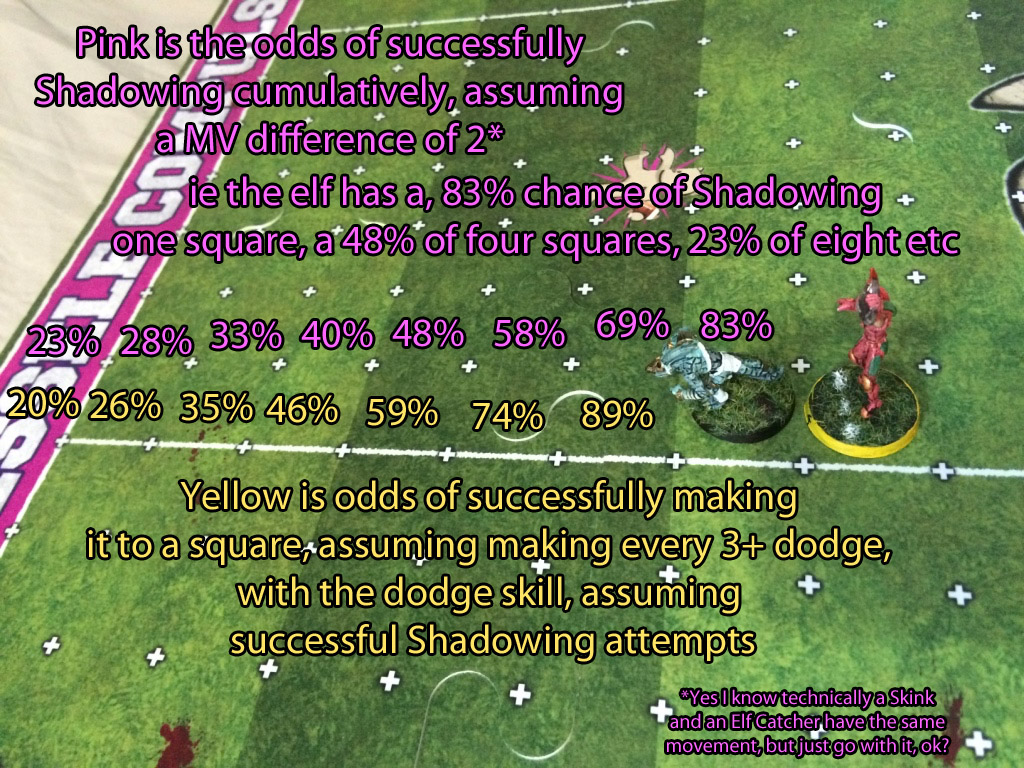
Oh Shadowing, that most underrated defensive skill, how I love you. Shadowing says, basically, roll two dice, add the Shadowers movement, subtract your own movement, and if the result is a 7 or less then the Shadower can move into the space you were just in. This triggers when you leave the space for any reason, provided it was part of your own action. Let’s start the discussion with some numbers. A MV6 piece shadowing a MV6 piece will successfully shadow 58% of the time. Not overwhelmingly brilliant so far. However, let’s see what happens when you increase the difference.
A MV7 piece shadows a MV6 piece 72% of the time. Heyhey, that’s looking much better! MV8 shadows 83% of the time. Here’s a quick and easy cheat sheet for your pleasure:
- 5+ 100% (≈ having fun when playing halflings)
- 4 97% (≈ odds of knocking a skill-less player down on a 3db with a reroll)
- 3 92% (≈ making two GFIs with Sure Feet)
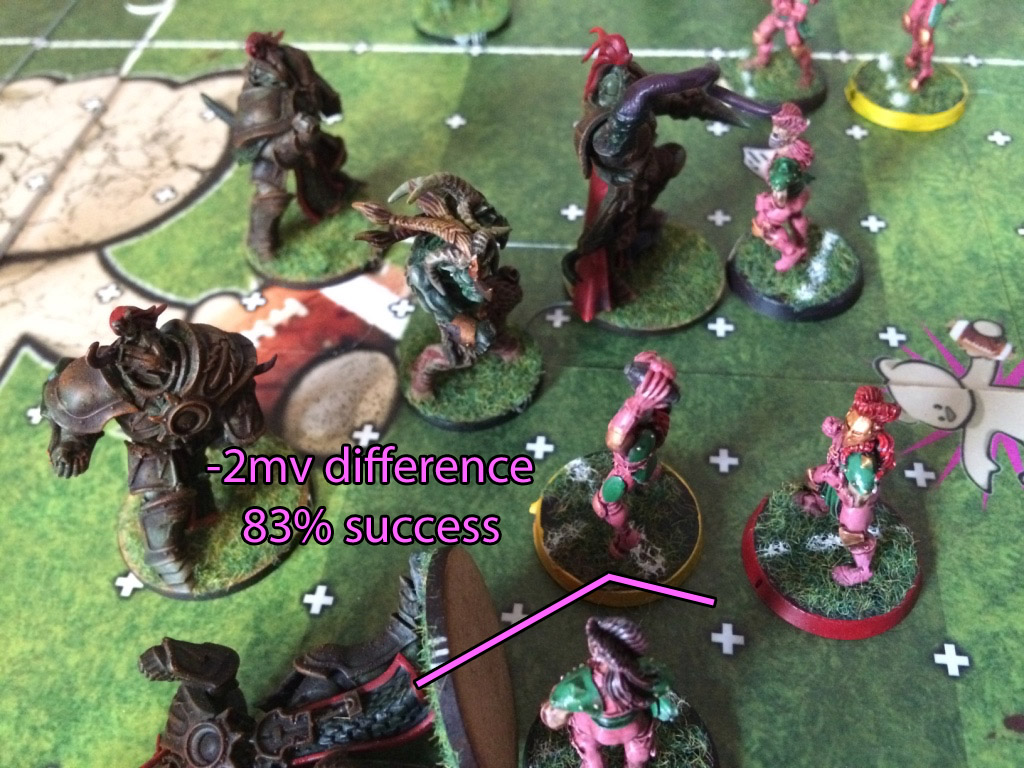
- 2 83% (≈ breaking av5 with mighty blow)
- 1 72% (≈ to knock down a skill-less player on a 2db when you have block)
- 0 58% (≈ odds of knocking a skill-less player down on a 2db with another skill-less player)
- -1 42% (≈ of a big guy with loner and a reroll taking down a blodger)
- -2 28% (≈ breaking av8)
- -3 17% (≈ knocking a blodger down with one dice)
- -4 8% (≈ breaking av10)
- -5 3% (≈ double skulls)
- -6+ 0% (≈ me winning the SWTC)
Interestingly, there is no critical success of failure after a certain point. Even if you roll a double 1, if your movement is 6 or greater than your opponent you will always escape. This works in reverse, too. A Gutter Runner will succeed 100% of the time in shadowing a Mummy or a Mreeman. Obviously, that’s quite rare, but can have potentially game-changing circumstances. A Mummy with Break Tackle isn’t going anywhere if you stick a mv8 shadower on him.
In fact, let’s look at a few more of the ways of using Shadowing. First, and perhaps the use for which most people initially think of, is it’s great for chasing ball carriers. Normally you give Shadowing to fast pieces, so you’re likely looking at good odds to chase him should he wish to escape. Why would you want to do this, though? Obviously, you can force your opponent to have to roll more dodge dice. More dice = more chance of failure. Combine with Tackle to make the most out of it, and, if you can, Diving Tackle. Those three skills together mean your opponent has almost no choice other than to block your shadower out of the way. If you can dictate what your opponent is doing, and where he throws his blocks, then you are taking control from him and stealing it for yourself.

To make life even better, take Side Step or Stand Firm to make your opponent scream. Slann Blitzers are particularly good at this, which is why Lottabottl, the Star Blitzer, exists. MV8, Shadowing, Diving Tackle. Beautiful.
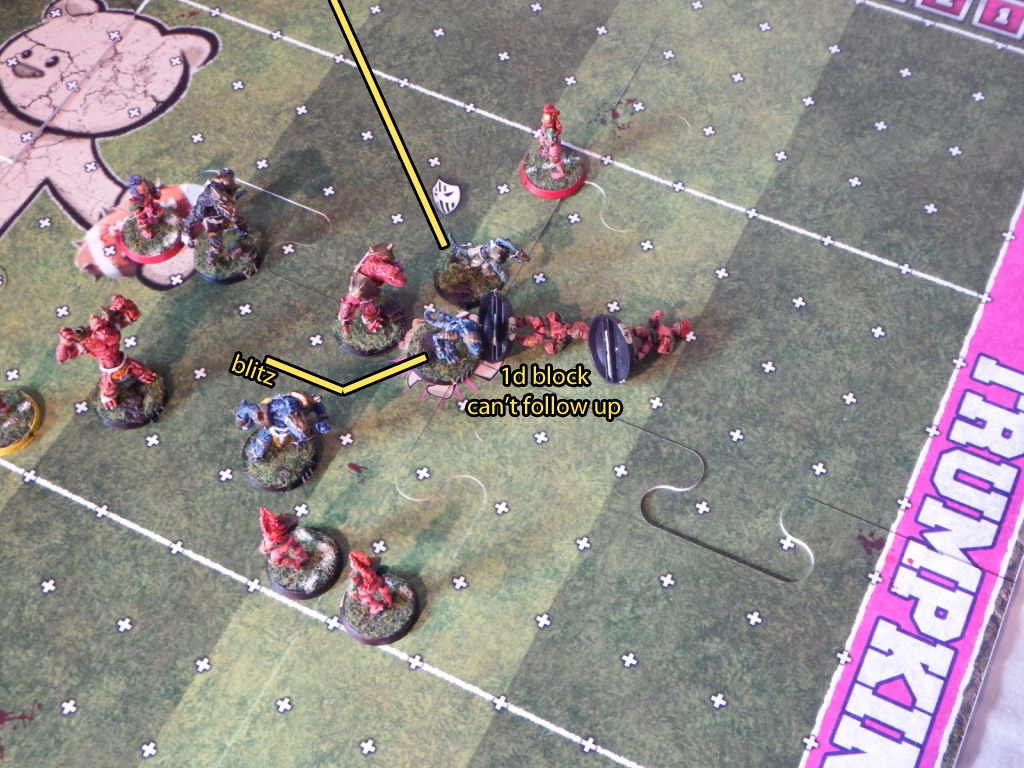
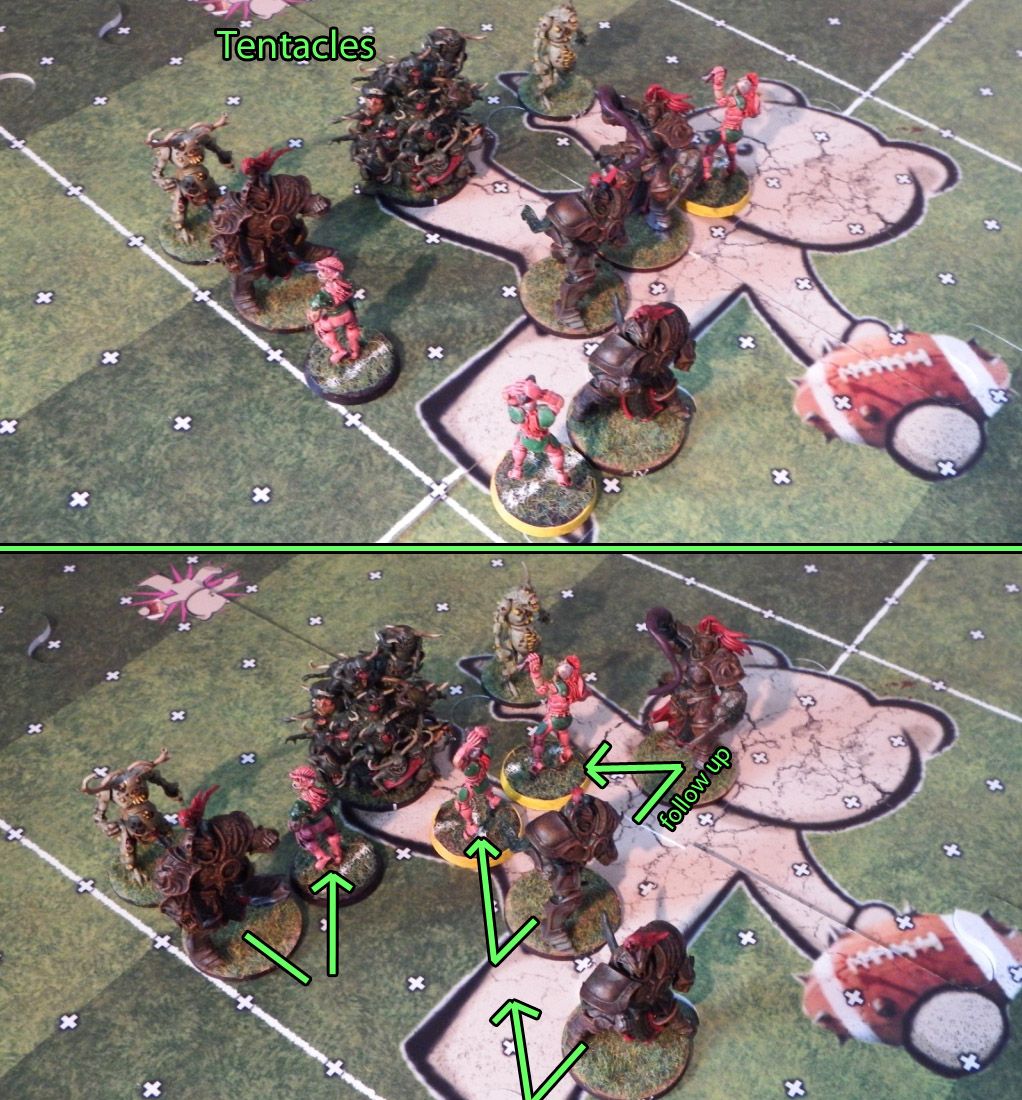
Secondly, you can use it in a less aggressive way. Shadowing can be used when an opponent performing an action leaves your tackle zone for any reason. He can be someone that’s dodged. He can be a Wardancer that’s just lept. He could have just blocked someone and has followed up. If it’s your opponent’s turn and he’s performing an action, you can shadow it. Again, this wrests control away from your opponent. You can get pieces up in his nose, block off pathways, make him think twice about following up.
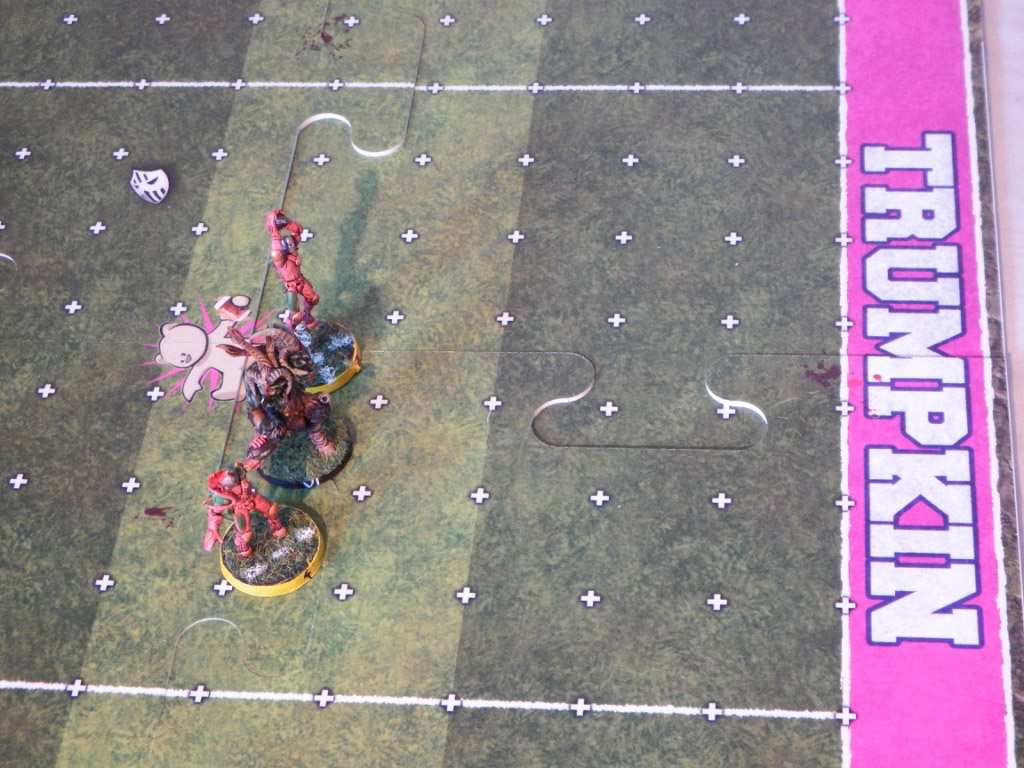
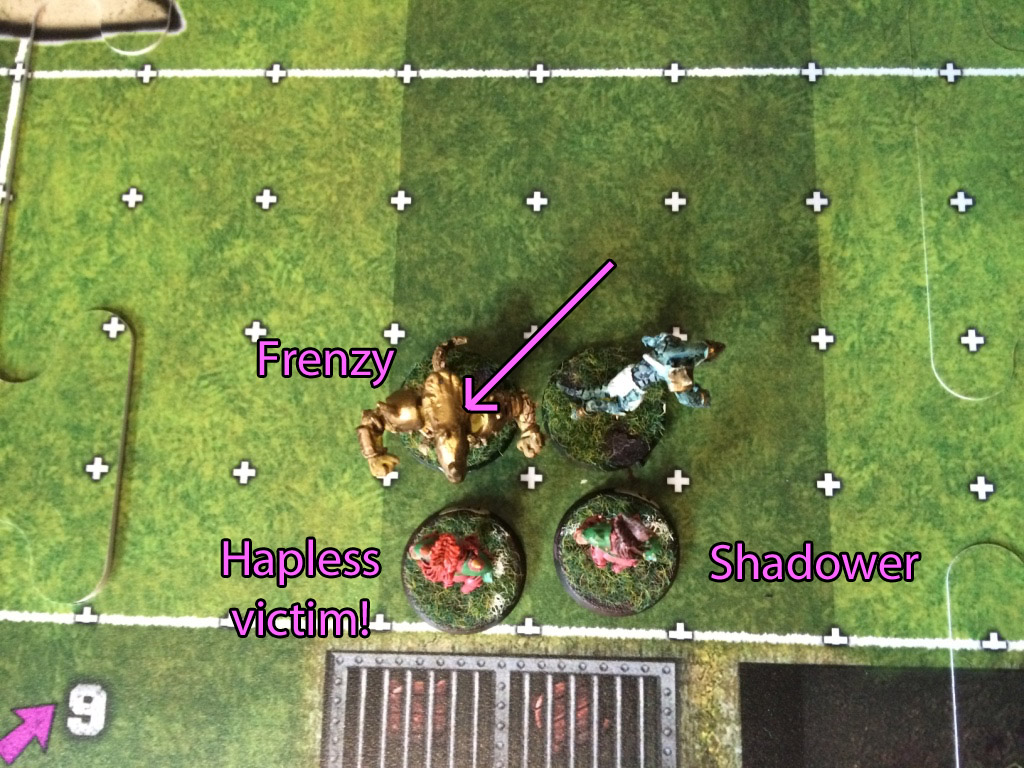
Lastly, a rather funny use of it is for following Frenzy pieces. If you think you’re going to get surfed, stick a Shadower nearby to follow the frenzy-surf piece. I’ve seen an assassin surf a Rat Ogre before after shadowing him, and have surfed a Minotaur myself after shadowing him.. Feels pretty good.
Fend
– Fend is another tasty little morsel of a skill. While its applications aren’t as numerous as Shadowing, it’s another reactive skill designed to get in the nose of your opponent, and can be fantastic when applied right. In case you’re unfamiliar with it, is basically means that you can choose whether your opponent has the option of following up when he blocks you. You don’t have to remain standing to use it. It’s again one of those skills that works best the more you have of it. So, here are the ways to utilise it:
1. Mind Games. There’s a lot of fun to be had at announcing to your opponent that you have elected not to use fend. “Why?” they ask, “what are they planning?”, you can hear them mutter. Even better when your opponent decides to not follow up, purely because you decided not to use fend.
2. Longevity. A player using fend is going to wind up in less tackle zones than one that isn’t. Less tackle zones = less blocks/dodges, less blocks/dodges means less armour rolls and less injuries. It’s also the only hard(ish) counter to ClawPOMB, as it stops the Piling On action. You still get ClawMB’d, and it doesn’t make a difference if they took the Both Down (or have Grab), but hey, it could be worse. It also outright cancels Frenzy, which is a nice bonus.
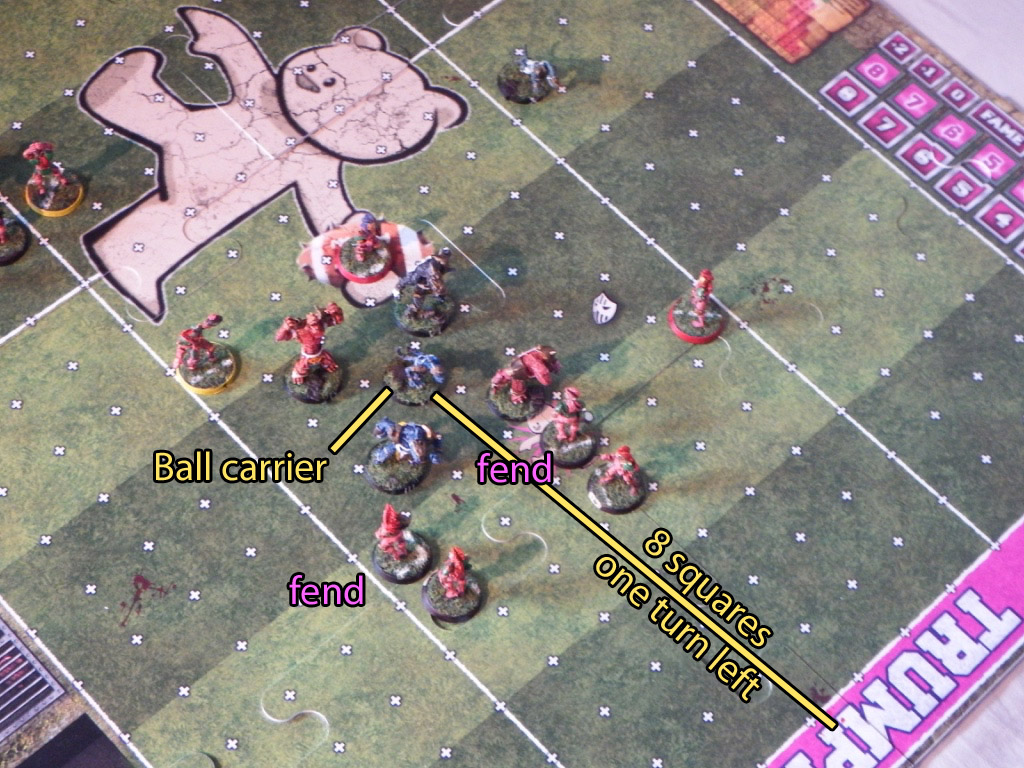
3. Buggering Up Your Opponent’s Plans. This is the most important use. A player that has not been followed up is free to run away next turn (obviously provided he isn’t in any other tackle zones, and hasn’t been killed!). That’s potentially a saved dodge roll. They’re also further away from whatever big nasty brute punched them, and the further you are the better. It’s much tricker to blitz a gap and run a piece through if you’re potentially being fended.
It’s a great meatbag skill to stick on the LoS. The best way to advance players if you’re a slow, grindy team like Orcs or Dwarves is to punch people down and follow up, so you don’t have to make the dodge rolls. Fend keeps them right where they are.
Stand Firm
So one way of annoying an opponent is to not let him follow up by fending him off. The other is to not let him follow up by being in the way!
Stand Firm means that when you’re pushed back, either as a part of a block/blitz action or a chainpush, you can elect to stay exactly where you are. Even if you’re knocked down, you remain in the same square.
Now, this is obviously very similar to Fend, with the express difference of you still being in an opponent’s tackle zone. There are, again, several beautiful uses for this fantastic skill.
Before I go any further, I just want to throw something in. Stand Firm, and to a lesser extent Fend, is a skill that gets better the more you have of it. One piece with Stand Firm isn’t going to achieve anywhere near as much as two are, let alone three or four. Think of them as valiant watchtowers, standing silhouetted against the enemy. One is easy to circumvent, but a line of them forms a stalwart defense. There are a number of skills like this that benefit the team, as opposed to the player. Tackle or Mighty Blow makes the player into a scary piece, and but massed Fend or Wrestle can change the whole playstyle of a team.
…where was I? Oh yeah, the uses of Stand Firm.
1. Sideline-caging. Caging against the sideline is normally a very bad idea. There are exceptions, for example Slann are great at it, but for the most part you don’t want to do it. It limits your ability to manoeuvre, and of course makes those ever-deadly crowd surfs much more likely. If you are going to try it, you want ways to keep your enemy at a distance, far, far away from anywhere where they can cause mischief. A couple of players with Stand Firm can provide that immovable defense that can be the the key to stopping your opponent from stopping your advance. They themselves can never be surfed (except by a Juggernaut player), they can cancel out potentially disastrous chain-pushes, and they can stop cage-cracking attempts dead, especially if they don’t go down.

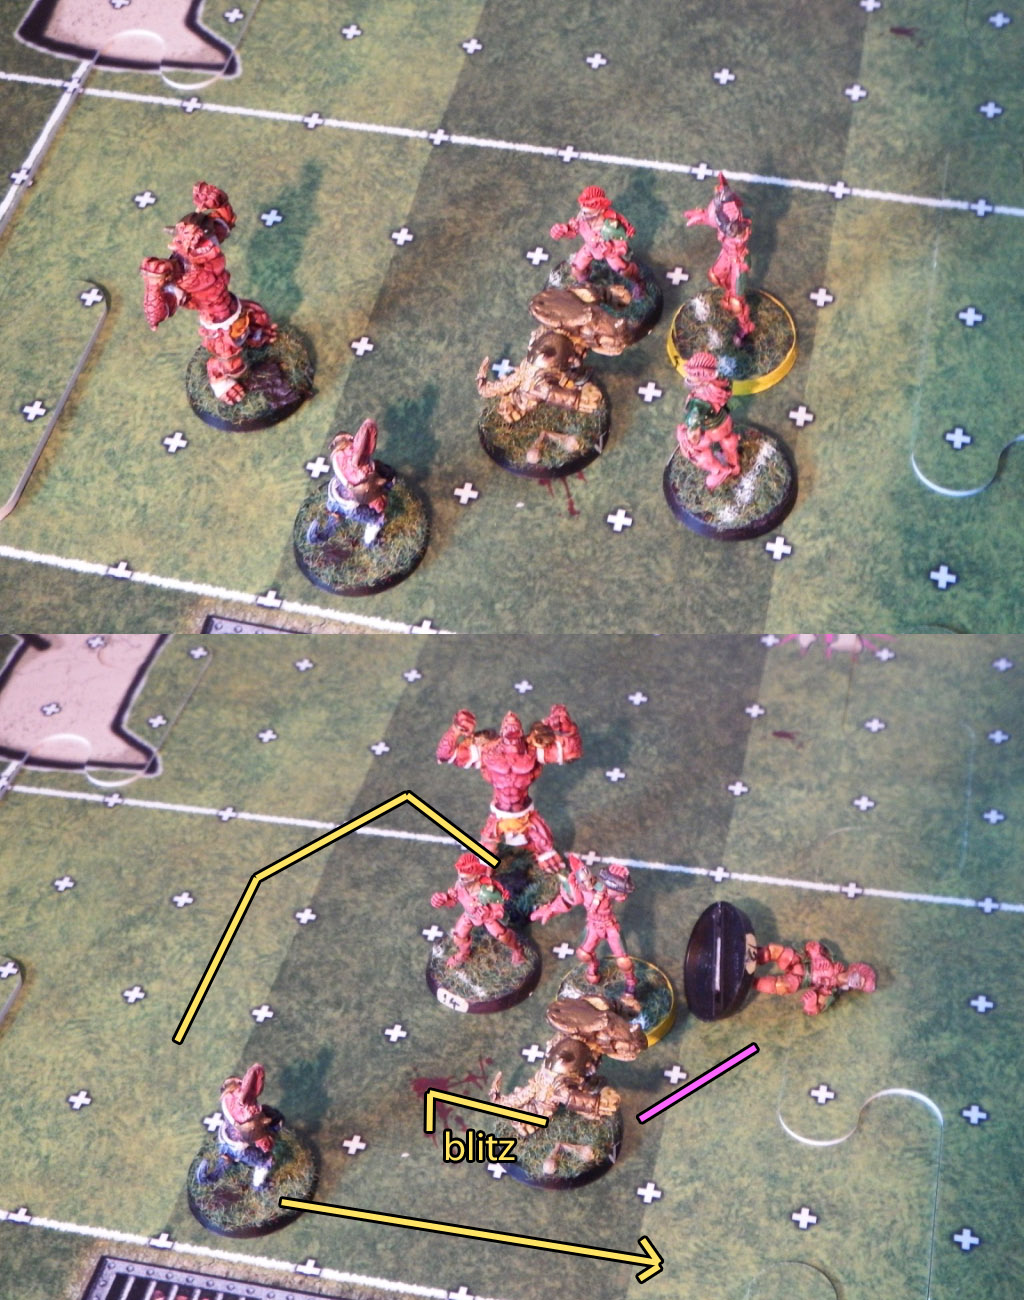
2. Buggering Up Your Opponent’s Plans. Again, muchos importante, amigo. If you’ve got a big ugly player that likes punching people, then you want him to be next to people so he can punch them. A Nurgle Warrior, for example, likes being in people’s faces. Even if you opponent can take him down, he can just stand right up again, safe in the knowledge that his would-be attacker hasn’t escaped his stinky wrath. Additionally, it crucially means that wonderful hole in your defense you opponent was going to crack? Yeah, he can’t any more. He’s going nowhere. Again, that wrests control away. Leave one Stand Firm-less player as a trap, force your opponent to try his luck that way, then watch as you spring your carefully wrought trap!
What’s also amazing is that it flat-out cancels ⇈ results on the dice. This means that including the skull, three of the six sides of the block dice are at best functionally useless, and at worst, potentially deadly. This is an instance in which I would suggest Block, despite my disapproval of it’s ubiquity. A player with Block and Stand Firm cancels out 4/6 facings of each dice thrown against them: ⇈, ⇈, 💥☠ and ☠ are all bad news. So now a single dice has only a 33% chance of having some kind of effect, with the other 67% chance being that your opponent achieves bugger all. On a two dice block we’re still looking at a 55% of successfully doing something, but still, that’s better than 88%! Even if they do take you down, you can still choose where you fall, potentially causing no end of strife.
It also works nicely with Jump Up. If you knock him down, you can just get back up and block him back, despite being on the ground (so long as you can manage a 2+/3+).
Grab
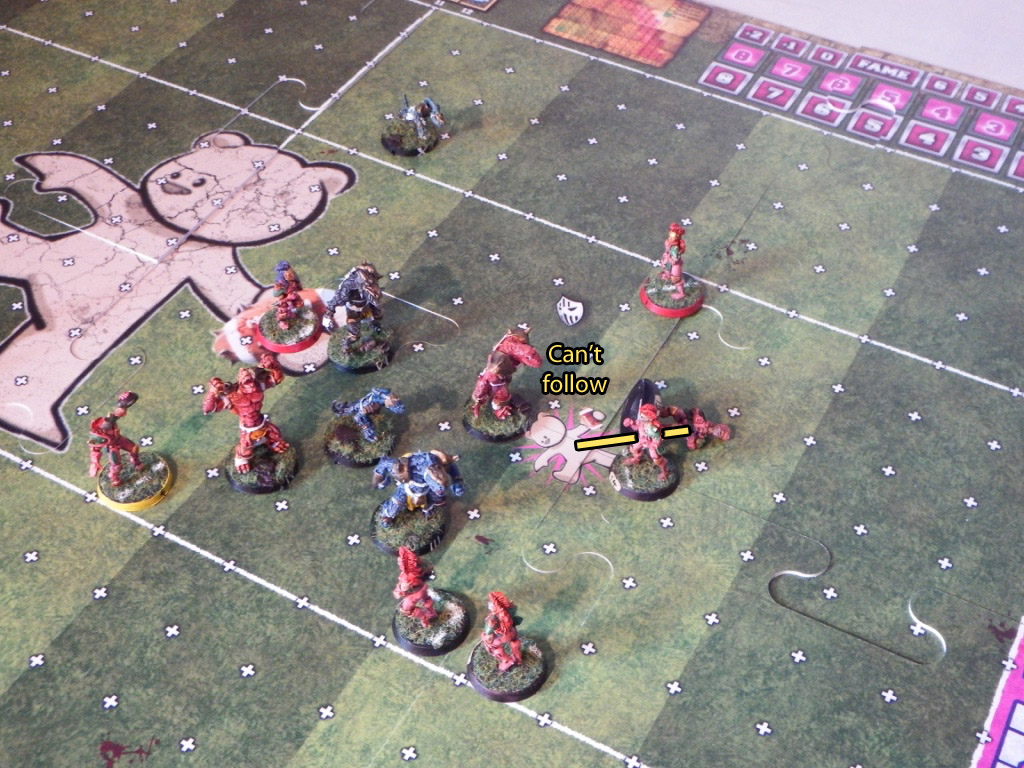
Last on today’s list is Grab. Grab is Side-Step in reverse. When you block someone, you can choose which square they’re pushed into, like normal, but what isn’t normal is that you can push them into any square adjacent to your victim, not just the three opposite the blocker. Nice. It also flat-out cancels Side-Step, which can be worth the cost of entry by itself!
It’s worth noting that you can’t, I repeat, can’t, use this skill on a Blitz action. Neither can it ever be taken on a player that has Frenzy (could you imagine the possibilities… drool.) It still cancels out Side-Step on a Blitz, but you don’t get the main benefit of swinging your opponent about like a rag doll.
So, when to use it?
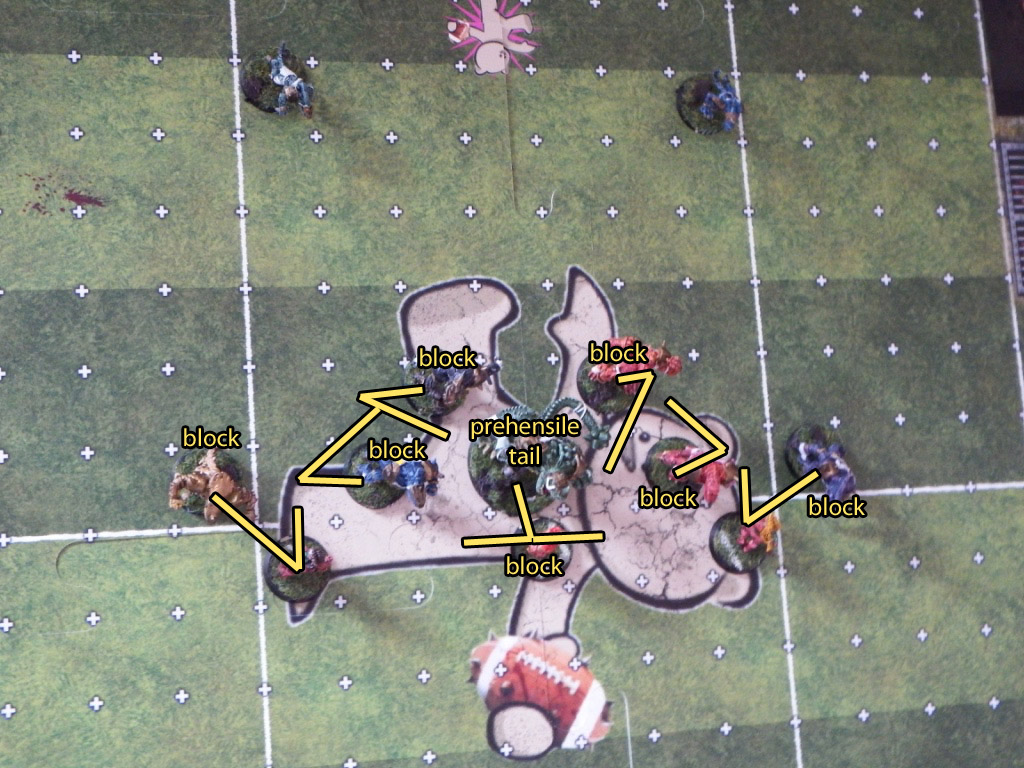
1. Maximum Punching. It’s great for maximizing blocks on players, especially those shifty ones that like to run away using Fend or stay up a lot using Blodge. You can drag them next to other players on the LoS, you can hold them close to you like a long lost-lover. Keep them near, punch them in the face, pick them up, punch them in the face. You can bring them deeper into your lines to be punched by your mates, or shove them into the warm, sticky Tackle Zones of a Tentacles/Diving Tackle/Prehensile tail player.
2. Freedom!! Grab is great for clearing holes and freeing players. It’s becomes a cinch to make huge, lurid gaps in people’s defense by putting them out of harm’s way. Against lower agility teams especially this can be brutal. Suddenly your Chaos Dwarf blodger is stuck the wrong side of a Treeman. He’s not exactly going to be dodging away any time soon, so he’s stuck. Think of the poor old Saurus, grab-swept behind that Troll, who with a paltry Agility 1 is now no longer anywhere near Mr Ball Carrier, and isn’t going to be.
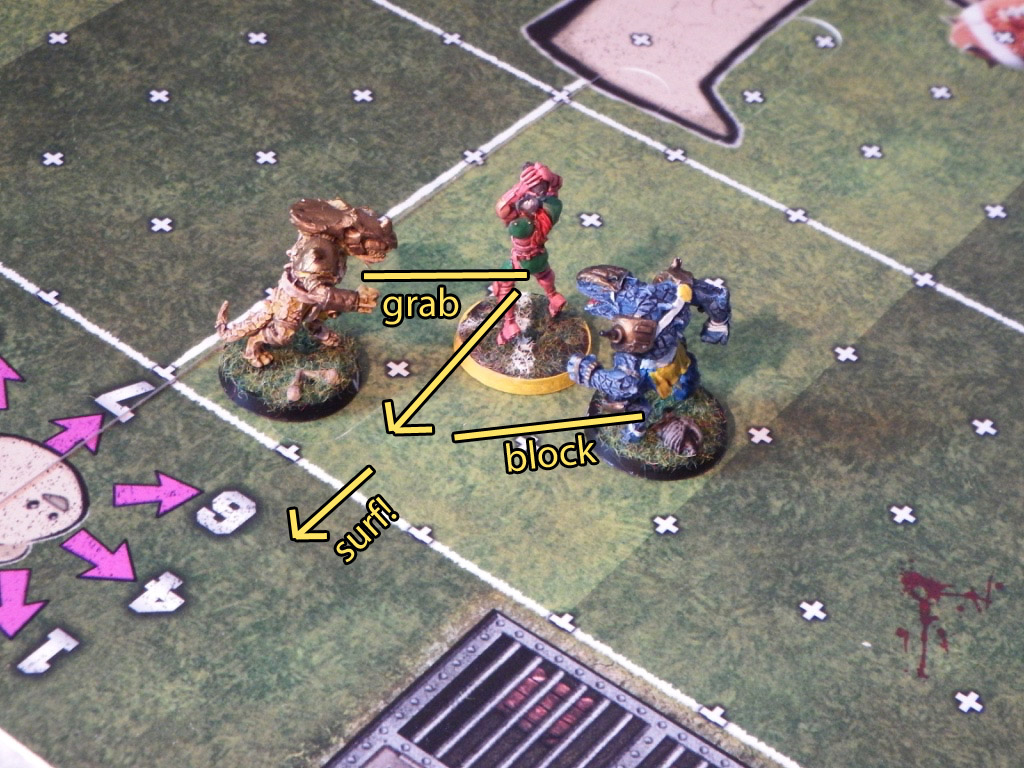
3. Surfing, duuude!
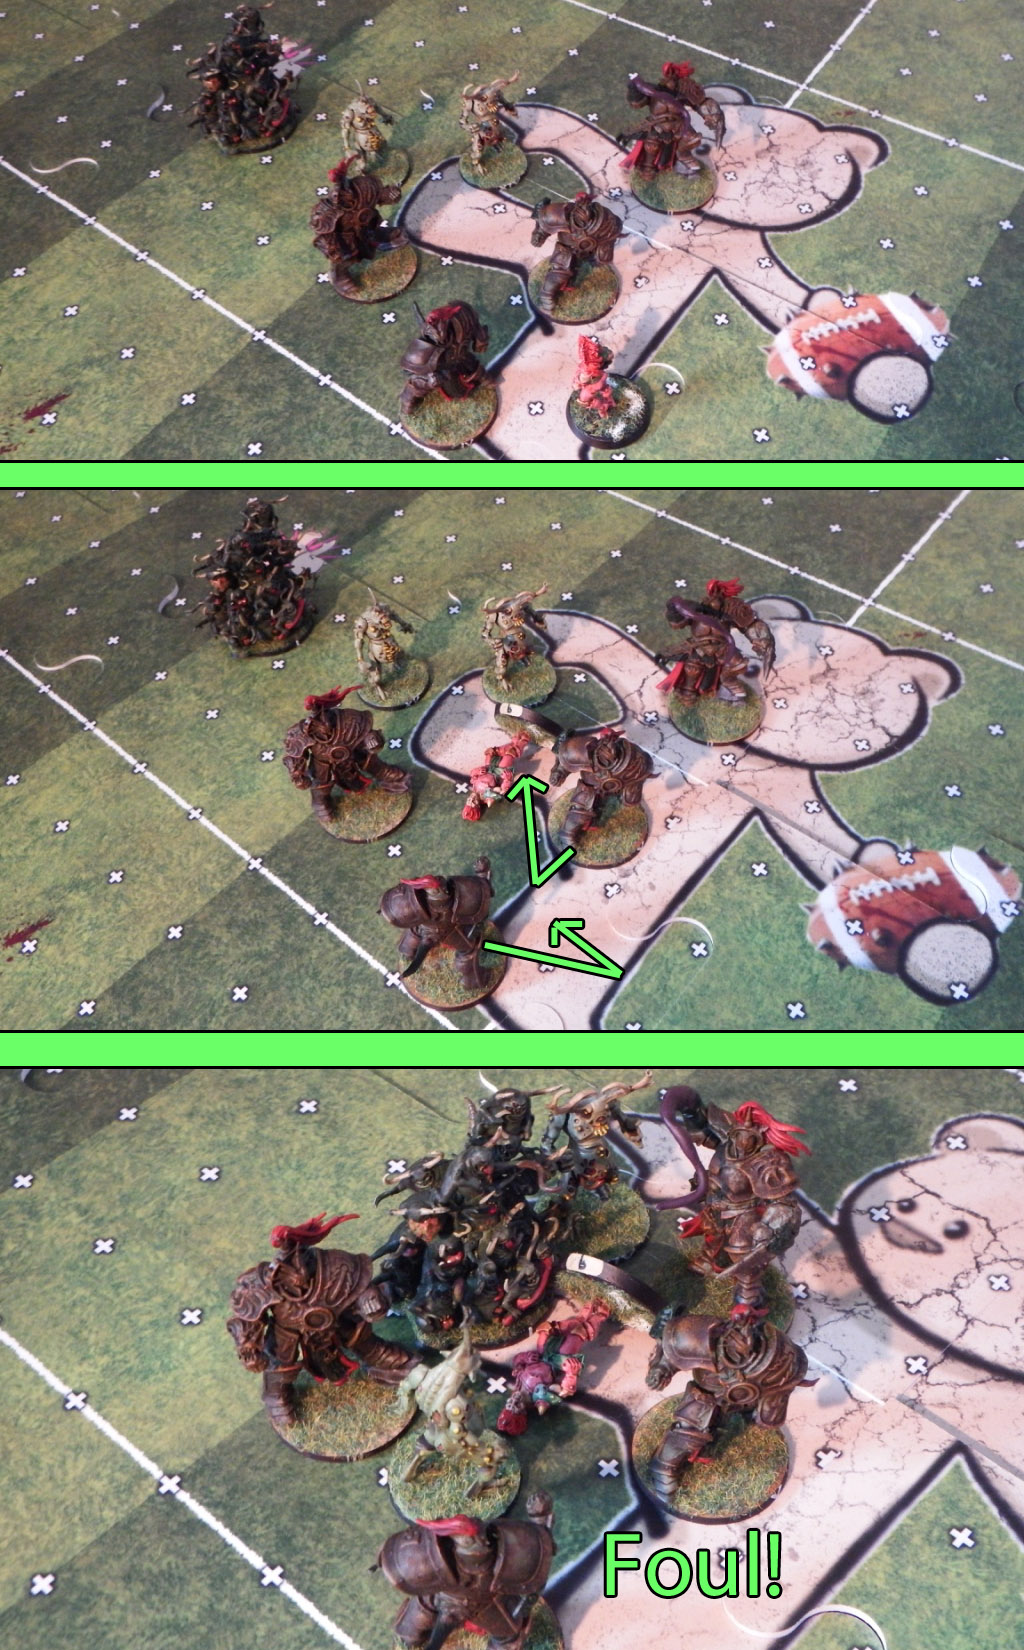
4. Foul Play. It’s also great for creating beautiful fouling opportunities. Why not bring that silly Wardancer deep into your backfield, where you can get 5 assists on him? Especially fun if you can do it several times in a row with two pieces to push them somewhere really nasty, then jump on them with a sticky pile of goblin goodness.
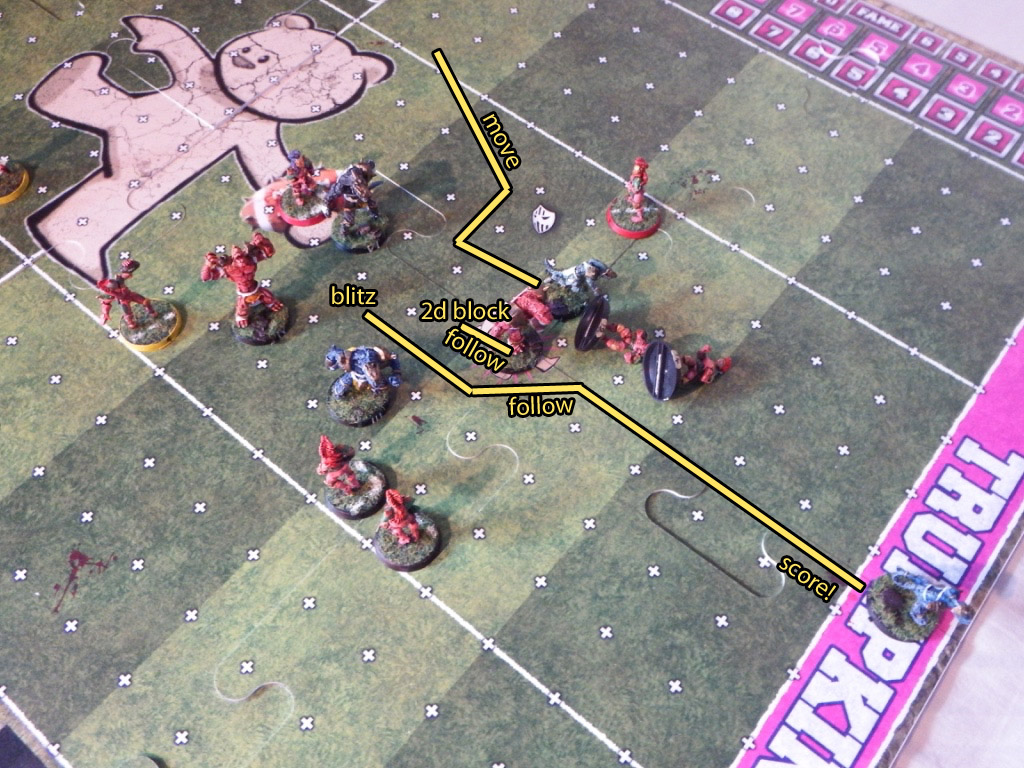
5. The ol’ One Turn Touchdown. The key to a successful OTTD is normally in funky chainpushes, created using a perfectly placed Blitz into a perfectly arranged LoS. Grab can make that so much easier. There’s too much to say on OTTDs for me to cover here, so I highly recommend trying it for yourself, or reading some of those dedicated articles that cover it so well.
So, that’s four more lower-tier skills for you all to consider. Once again, I cannot encourage you enough to split from your comfort zone into the land of the ‘low tier’ skill, to try them out for yourselves. You’ll be amazed what you can uncover and achieve when you lose that Must Blodge Everyone mindset!
I love taking shadowing on Gutter Runners and Tentacles on Chaos Minotaurs so I knocked up an Excel spreadsheet for quick reference: